Monday, October 15, 2012

Tutorials for Designing/Creating Animated Advertisements Banner with Adobe Photoshop

Please share with your friends if you like this article


Create animated gif banner tut img
Hi everybody, how are you? This is another tutorial on animated commercial banner ad design. Hope that you have already gone through our previous animation tutorials and the basics of animations. Today we will design a very simple banner Ad. If you want to be a freelancer and work at Odesk or any other freelancing site this lesson must help you. Ok, we may start now. But don’t forget to watch the video tutorial carefully.


1. Open a new file with 200×200 px.

2. Open the two images those you want to use as Ad background and resize with Free Transform (or press CTRL+T) tool. Also name those layers as Slide1 & Slide2.

3. Type some texts for your Slide1 background. Create Group1 from the bottom of your layer palette. Drug and drop all text layers into Group1.

4. Type some different and relevant text for Slide2 background. Create Group2 from the bottom of your layer palette. Drug and drop all text layers into Group2.

5. Now Duplicate Group1 & Group2.

6. For the layers of Group1: Rasterize and go to Menu> Filter> Blur> Motion Blur. Set the Angle=0 and Distance=10 pixels. For the layers of Group2: do the same as you have done for Group1.

blur effect

7. Important Part:

Go to Window> Animation to open Animation window. In the animation window you will find the 1st frame is automatically generated. At first deactivate all layers clicking on the eye icon except the white/transparent background.

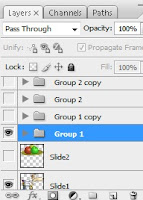
layer palette final for ad

  • For 1st Animation frame: Go to the layer palette and click on the eye icon of Slide1 and Group1 to activate. The other layers will remain deactivated. Duplicate 1st Animation frame and create 2nd Animation frame.

  • For 2nd Animation frame: Go to the layer palette and Slide1 will remain open and click on the eye icon of Group1 copy to activate. The other layers will remain deactivated. Duplicate 2nd Animation frame and create 3rd Animation frame.
  • For 3rd Animation frame: Go to the layer palette and click on the eye icon of Slide2 and Group2 to activate. The other layers will remain deactivated. Duplicate 3rd Animation frame and create 4th Animation frame.
  • For 4th Animation frame: Go to the layer palette and Slide2 will remain open and click on the eye icon of Group2 copy to activate. The other layers will remain deactivated.
Final Animation Frames for Ad Creation img

8. Set the delay time for 1st Animation frame=0.5 sec, 2nd Animation frame=2 sec, 3rd Animation frame=0.5 sec, 4th Animation frame=2 sec.

9. Now click on the play button on animation window to test the output. You will find that the commercial Ad banner is ready to use.

10. Go to File menu and select Save for Web Devices to save this animation .gif file.

Wednesday, September 26, 2012

Easy 2D Cartoon Animation Tutorial With Adobe Photoshop

Please share with your friends if you like this article


Thank you everybody for being with us. In our ‘Glittering Text Effect’ tutorial we have discussed about The Basics of Animation With Adobe Photoshop. Today we will discuss about an easy method to make a simple 2D Cartoon Animation. If you watch our video you must feel that it is very easy to animate any still picture and to make it live. Exciting? Ok, let us move…

2D Cartoon Animation Image


1. Open any image/cartoon image of a dog (If you use the picture of your pet dog it will be very interesting for you).

2. Copy the original layer and we will work with this copy layer.

3. Select the Rectangular Marquee Tool and select the tail area of the dog. Press CTRL+X and CTRL+V.

4. You will find only the tail of the dog in a separate layer. Select this layer and fix it to it’s original position.

5. Copy this layer for 2 times and name those: Down, Middle & Up like the image bellow.

Layer Pattern Image

6. Now you can delete the original image and a new Background layer.

7. Select the layer named ‘Down’ and go to menu and select: Edit> Free Transform (or press CTRL+T).

8. Move the upper part of the tail to downward and adjust it to the body.


9. Select the layer named ‘Up’ and go to menu and select: Edit> Free Transform (or press CTRL+T).

10. Move the upper part of the tail to upward and adjust it to the body.

11. Now select the body layer of the dog and select Elliptical Marquee Tool and select around the visible eye area of the dog. Make a new layer bellow Down layer and name it Eye like the image bellow.

layer palette image1

12. Select the Eye layer and fill the selected eye with red color and press CTRL+D to deselect the selection. When the Eye layer is selected set the blending mode of the layer to Hard Mix and set its Opacity to 0%.

13. Important Part:
Go to Window> Animation to open Animation window. In the animation window you will find the 1st frame is automatically generated. Go to the layer palette and click on the eye icon of Up and Middle layer to deactivate these layers.

Duplicate the 1st frame of animation window. Now select this 2nd frame. Go to the layer palette and click on the eye icon of Middle layer to activate it and click on the eye icon of Down layer to deactivate it. Select the Eye layer and set its Opacity to 30%.

Duplicate the 2nd frame of animation window. Now select this 3rd frame. Go to the layer palette and click on the eye icon of Up layer to activate it and click on the eye icon of Middle layer to deactivate it. Select the Eye layer and set its Opacity to 100%.

14. Set the timing of 3 frames of animation window to 0.2 sec.

15. Now click on the play button on animation window to test the output. You will find that the dog cartoon is moving its tail and its eye is glowing.

16. Go to File menu and select Save for Web Devices to save this animation .gif file.

Monday, September 24, 2012

Glittering Text Effect Animation Tutorial With Adobe Photoshop

Please share with your friends if you like this article

You have waited a lot for the animation part. Sorry for the inconvenience. Today we will discuss about the basics of animation with Adobe Photoshop and the 1st animation tutorial is here for your better understanding. Don’t forget to watch the video carefully. Feel free to make any comment or contact us for further assistance.

Basics of Animation With Adobe Photoshop:

Actually every motion/animation/video is frame based. In Adobe Photoshop you have the freedom to create several frames to make any animation work. Say for example you want to animate any object from left to right. You can create 4 layers of same object. Don’t change the 1st one. For the 2nd one move slightly from left to right and for the 3rd one move more to right. Move 4th one totally to the right position that you want. Place every movement of the object in individual frame of the animation window. Play animation and the object will turn from left to right. For smooth animation increase the numbers of frames and movements. Use Tweens option to create auto movements and several frames with a single command. Hope that you get the primary concept of Animation. Go through the bellow tutorial as well as the upcoming tutorials to have the complete knowledge of animation.


Tutorial on Glittering Text Effect:

Glittering Text Effect Animation Image

1. Create a new file.

2. Fill the background layer with your desired color.

3. Select Type Tool to write any text on it.

4. Right click on the text and select Rasterize Type.

5. Copy this layer 2 times and name those layers: 1ST, 2ND & 3RD

6. Now we will add noise to these layers. Select 1ST layer and go to: Filter> Noise> select the amount 30. Select 2ND layer and select the Noise amount 40. Select 3RD layer and select the Noise amount 50.

7. Go to Window> Animation to open Animation window.

8. This step is very tricky. In the animation window you will find the 1st frame is automatically generated. Go to the layer palette and click on the eye icon of 2ND layer to deactivate this layer.

layer palette image

Duplicate the 1st frame of animation window. Now select this 2nd frame. Go to the layer palette and click on the eye icon of 1ST and 3RD layer to deactivate these layers and click on the eye icon of 2ND layer to activate this layer.

Duplicate the 2nd frame of animation window. Now select this 3rd frame. Go to the layer palette and click on the eye icon of 2ND layer to deactivate this layer and click on the eye icon of 3RD layer to activate this layer.

9. Now click on the play button on animation window to test the output. Yes, you will find a nice glittering effect on your text.

10. Go to File menu and select Save for Web Devices to save this animation .gif file.
Sunday, June 17, 2012

Reflection Effect of Any Text or Image in Adobe Photoshop

Please share with your friends if you like this article


This is a very common as well as important effect of Adobe Photoshop and you may see it in different works. So let’s try. First of all don’t forget to watch the video.

1. Open a new file and type your desired text. You may decorate the text from Blending Options.

2. Now duplicate the Text Layer and select it. Go to Edit Menu> Transform> Flip Vertical.

3. Select the Move Tool and press the down Aero Key ↓ to place the duplicated text to an alternate position.
Photoshop Tutorial on Text or Image Reflection Effect

4. Again select the duplicate text layer and select Add Layer Mask from the bottom of the Layers Palette. Make sure that the foreground and background colors in the tool bar on the left turn to black and white.

5. Select the Gradient Tool and make sure that it is filled with black and white color like the image bellow.

Photoshop Tutorial on Text or Image Reflection Effect

6. Now come to the magical part. Just fill the text of duplicate layer with Gradient color from bottom to top. Your reflected text is ready. Now you can try to make the object attractive in several manners.

Photoshop Tutorial on Text or Image Reflection Effect


Saturday, June 2, 2012

How To Design Glass Effect Text in Adobe Photoshop

Please share with your friends if you like this article


Well, we are now going to work with text decoration and text effect. It is too much useful for everyone for web design, logo, banner..etc. Watch the video carefully first.

1. Open a new file.

2. Select Gradient Tool and decorate the background like the picture bellow. Type your text on it.

Photoshop Tutorial on Glass Effect Text

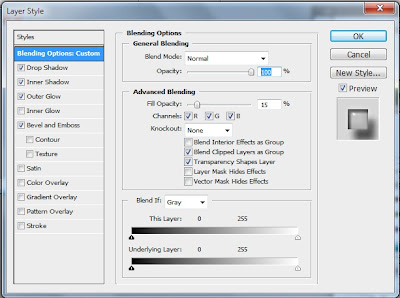
3. Select the Text Layer. Right click on it and select Blending Options.

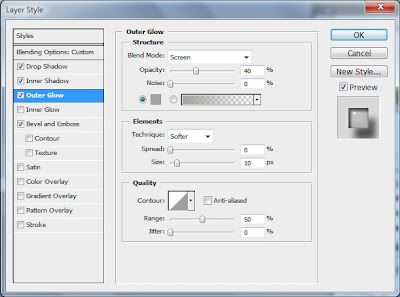
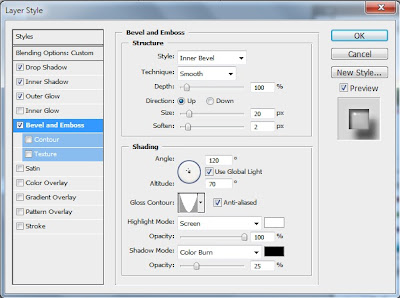
4. Now step by step put the value from the options like the image bellow:

Photoshop Tutorial on Glass Effect Text

5. It is simply unbelievable to find your text with glass effect.

Photoshop Tutorial on Glass Effect Text


Sunday, May 27, 2012

Easy Face Change/Replace Tutorial in Adobe Photoshop

Please share with your friends if you like this article

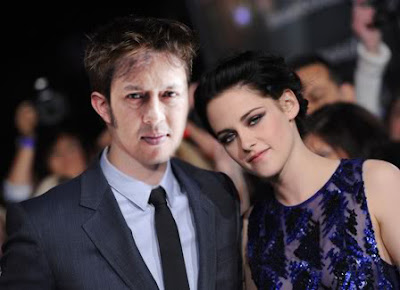
Photoshop Tutorial on Face Change/Replace

Now we are quite advanced level. Reaching this level most of the designers want to replace head from one to another and enjoy it very much. Actually from this work designers realize the power of Adobe Photoshop. I’ve tried my level best to prepare the lesson very simple and easy. Since this is a funny work have fun with this tutorial.


1. Open background image then another image that you want to place on it.

2. Select this 2nd image and select the face with Elliptical Marquee Tool.

3. Now select the move tool and drag this selected area on background. This will create Layer 1.

4. Select layer 1 and Opacity to 50%. Place the new face correctly on background face. Press Ctrl+T and use Move Tool for better placement.

5. Now Select Eraser Tool with soft and small brush size. Start brushing the edges of the new face. Select the Opacity to 100% again.

6. You can use Liquify option for background layer to push any part of background for adjustment. For this go to Menu> Filter> Liquify.

7. Now the finishing part. Go to Menu> Image> Adjustments> Hue/Saturation. Just adjust the color of the new face and you are done.

Tuesday, May 22, 2012

How to Retouch Photo with Glossy /Glowing Effect in Adobe Photoshop

Please share with your friends if you like this article


Watch the video tutorial first. It is very simple, easiest & quick glowing/glossy photo effect for photo retouching. Let’s start.

Photoshop Tutorial on Retouch Photo with Glossy /Glowing Effect


1. Open the faulty image.

2. Copy the 1st layer (background). We will work now with this copy layer. Go to Menu> Filter> Blur> Surface Blur. Now adjust Radius & Threshold. Here I’ve used Radius-4 & Threshold-8.

3. Now copy this 2nd layer and 3rd layer will be created. Select this 3rd layer.  Go to Menu> Filter> Blur> Gaussian Blur. Put the value for adjustment. Here I’ve used Radius-2.0 px.

4. When the 3rd layer is selected set the blending mode of the layer to Overlay. You will find your picture glossy and smooth.


Thursday, May 17, 2012

Easy Photo Retouching and Skin Correction with Photoshop

Please share with your friends if you like this article

In this video tutorial we will try to show you the easiest way to retouch and correct the skin of any image or camera photo. This is one of the most amusing works of Photoshop. Please watch the full video tutorial with full concentration.

Photoshop Tutorial on Photo Retouching and Skin Correction

1. Open your faulty image.

2. Click on Patch Tool. Now select all the faulty areas. Keep the mouse pointer inside the selected zone and drag it to the same color spotless skin. Now press Ctrl+D to remove selection.

3. Do the No-2 step for all faulty skins.

4. You can use Spot Healing Brush to remove black or other spots. Selecting the tool just click on the spots to heal.

5. To make the skin smooth use Dodge Tool & Burn Tool.

6. If you want to give the skin a stylish look follow the next instructions.

7. Select from menu: Filter> Blur> Surface Blur. Now adjust Radius & Threshold to make your image as per your expectation.

8. Yes, you have done it.


Sunday, May 13, 2012

Photoshop Tutorial on Artwork Using Radial Effect

Please share with your friends if you like this article

Photoshop Tutorial on Artwork Using Radial Effect

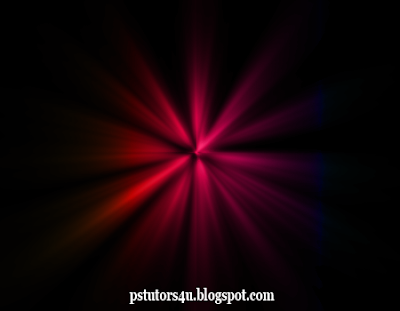
Watch this video carefully to use Radial Effect for creating any splendid Artwork with Photoshop. This is the first lesson of Artwork. We will discuss about different Artworks in our upcoming lessons. If you learn how to create Artworks you will be able to create wonderful wallpapers and banners.


1. Open a new file.
2. Select Paint Bucket tool and fill with black (000000) color.

3. Create a new layer (not mandatory but it can be used for animation or other design).

4. Now select Brush tool and select a hazy brush like the video. Start brushing maintaining a circle like video. Select white color before brushing.

5. Select from menu: Filter> Blur> Radial Blur>

6. A Radial Blur Dialog Box will open. Make the Amount: 100, Blur Method: zoom and Quality: best.

7. Now press Ctrl+F several times to get the perfect result.

8. Create another new layer and fill it with colorful Gradient.

9. Now come to the magical part. Just set the blending mode to Color. Your wonderful Artwork is created.


Friday, May 11, 2012

How to Enlarge an Image with Photoshop in Good Resolution

Please share with your friends if you like this article

This is the most perfect way to enlarge any tiny image maintaining good resolution. This is also a very secret trick that I’m going to disclose. If you watch the bellow video carefully you must be happy with this great image enlargement technique of Photoshop.


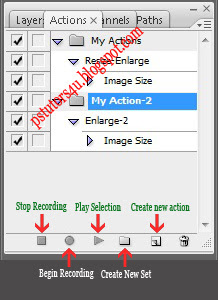
1. First open the image & create/record an action like the video. Window-->Actions-->Create a new set-->Name the Set-->Create a new action-->Record Action.

tutorial- How to enlarge image/photo in Photoshop

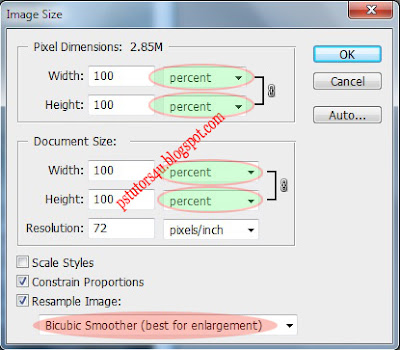
2. Now go to the Image Menu-->Image Size-->Select all Options to Percent from Dropdown menu-->Increase Percent Value 102/103-->Select Bicubic Smoother (best for enlargement). Now press Stop Playing/recording button. Your new action is created.

tutorial- How to enlarge image/photo in Photoshop

3. Open any tiny image and go to Window-->Actions-->and start pressing Play Selection Button and the tiny image will be enlarged.

If you like this secret tutorial just shout.

Monday, May 7, 2012

How to Remove Red Eye in Photoshop CS3 and Other Versions

Please share with your friends if you like this article


Watch the video carefully. It is very simple in Photoshop cs3/cs4/cs5 to remove red eye fault from any photo.

1. Open the faulty image from file menu.

2. Select the Red Eye Tool and select each eye of the image separately.

3. Wow! The red is vanished! Simple 123….

tutorial- How to Remove Red Eye in Photoshop

Sunday, May 6, 2012

How to Remove Image Background Using Pen Tool with Photoshop: Tutorial & Tricks- 3

Please share with your friends if you like this article

Pen Tool is one of the most popular tools in Photoshop. All designers can not think without it for a moment. Actually it will offer you the freedom to create anything you want. In this lesson we will show you the easiest way to remove background with this marvelous tool. Excited? Let’s start.

1. Open the image from file menu.

2. Select pen tool right clicking on tools. Be careful that you’ve also selected paths beneath the menu. Pls. follow the picture bellow.
tutorial on background remove

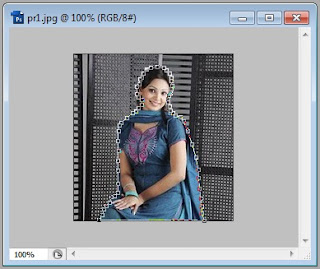
3. Start selecting the edges of your object. If the line is extra curve select with shot gaps.

tutorial on background remove

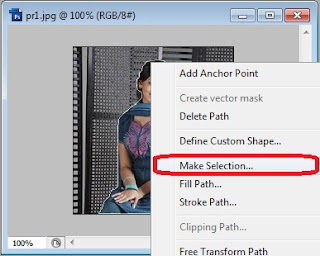
4. Finish selecting and right click on the selected object and select “make selection”.

tutorial on background remove

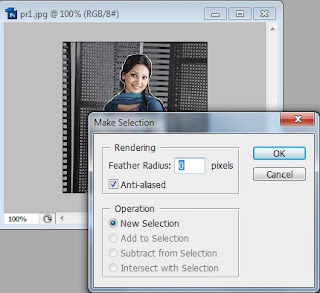
5. A popup dialog box will open. Now press ok like the image bellow.

tutorial on background remove

6. Your object is now selected. Press Ctrl+C and Ctrl+V.

7. You will find the object without background in a separate layer. Delete the background layer and save the file.
tutorial on background remove

8. Thinking about any rough edge? Correct it with burn/eraser tool. We will discuss it in the upcoming lessons.

How to Remove Image Background Using Mask Tool with Photoshop: Tutorial & Tricks- 2

Please share with your friends if you like this article

In this tutorial we will work with one of the amusing tool of Photoshop- “Mask Tool”. You can do various professional works with this tool. Consider it as the first lesson of “Mask Tool.

1. Open the image file in Photoshop.

tutorial on background remove

2. Select the image layer and click on the rectangle (layer mask tool) which is at the bottom of the Layers Palette.
tutorial on background remove

Now you will find some changes like bellow:

tutorial on background remove

tutorial on background remove
First, the foreground and background colors in the tool bar on the left turn to black and white. Second, a small white rectangle will appear next to the thumbnail of the image in the Layers Palette, and third, a gray square with a white circle will be placed to the left of the thumbnail of the image in the Layers Palette.

3. Click directly on the rectangle (layer mask) which is next to the thumbnail of the image. This will insure that you are now working on the layer mask.

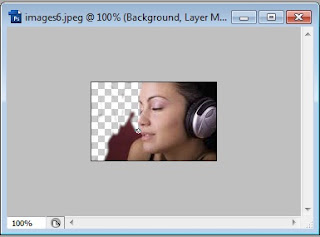
4. Now use the brush tool, using a hard edged brush, with black as the foreground color. Remember, when foreground color is black, it removes and when white it replaces.

5. Now, start brushing on the background of the image to remove background. If you accidentally remove any part, just stop there. Select the foreground color to white and start brush on the missing area to replace those parts. Always think about the size of your brush to maintain accuracy.
tutorial on background remove

6. Once you've replaced those missing parts switch back to the black foreground and continue brushing until you have removed all of the background from the image.

7. Now save the image. You will find that the background of the image is removed.

How to Remove Image Background with Photoshop: Tutorial & Tricks-1

Please share with your friends if you like this article

1. Open Photoshop.

2. To remove backgrounds open the Image first.

3. Right click and copy the background layer. Find it at right of your screen.

4. You will find a new layer and we are going to work with this new layer.

5. Click on the Quick selection tool at left of your screen. Now start selecting the edges of the object that you want to separate. Now find this tool with + or – icon beneath the menu. If you accidentally select inside or outside of the object you can easily correct it clicking – icon. For perfect result the size of your brush should be increased or decreased. Completing selection press Ctrl+C and Ctrl+V.
tutorial on background remove

6. Now the final result is ready. You will find the expected object without background. You can delete the rest of the layers or can use it for advanced level.